Painting Red - Lord of Lannister Bust

Preface

I originally wrote this tutorial back in 2014 when I painted the Nutsplanet Lord of Lion Bust. When I switched my website over from a blogspot domain to Squarespace, this was one of the tutorials I did not port over. I can’t remember why I didn’t at the time but it has been my most sought after and asked for tutorial to date. I realized that there may still be a record of it on the worldwide web if I went searching for it. Lo and behold! It still exists but it was not easy to find. So, here it is, recreated so I can directly link it for whomever would like it. Any additional information I’ve added at the time of this reposting will be in italics.

Disclaimer: I wrote this tutorial just after having worked for Privateer Press as a studio painter, hence the list of P3 Paints used. Today I use artist acrylics, however, this tutorial can still be used as a general guide and you can substitute in your preferred paint range.

I have also told
my Twitch followers that I will do a painting red tutorial on a stream in the future. I am currently writing this in July 2022. I will announce on my Instagram when I plan to do a Painting Red tutorial live on stream.

Red is a color that seems to give a lot of people painting problems and it used to give me a lot of headaches as well. Then I had to learn to paint red quickly and efficiently while I was at Privateer Press because I painted tons and tons of Skorne.

Recently, I painted the Lord of Lion Bust from Nuts Planet which is Tywin Lannister from Game of Thrones. I wanted to paint him the way I image from reading the books which means some red leather armor. So, I began the way I always do . . . here are the steps to painting a great looking red.

Supply List:
P3 Sanguine Highlight
P3 Sanguine Base
P3 Coal Black
P3 Ember Orange
P3 Menoth White Highlight
P3 Red Ink
P3 Turquoise Ink
P3 Armor Wash
Liquitex Magenta Ink
Liquitex Violet Ink

Step 1: Basecoat the entire area in a midtone red. Here I've used P3 Sanguine Highlight as my basecoat color. You can use any type of red, you just don't want it to be dark since we will work on shading next.

Step 2: Shade using a darker red. I've used P3 Sanguine Base as my first shade.

Step 3: Mix a Blue and Red together for the darkest shade. I've used P3 Coal Black and P3 Sanguine Base for the shading.

Step 4: Start highlighting by mixing an orange mixed with your base red. Here I've used a mix of P3 Ember Orange and P3 Sanguine Highlight.

Step 5: You guys are gonna start to freak out but trust me on this. Mix Menoth White Highlight into your previous mix. Yes, it will get pink. Yes, it will get chalky. That's okay. Trust me. Keep going.

Step 6: Mix even more Menoth White Highlight into your previous mix. It should be a super light pink and will look totally weird against the rest of the red. You need to make sure at this step your shadows are really dark and your highlights are really bright. In the next step, the magic starts to happen.

Step 7: Thin out some of your inks with water and start glazing them on. Thinning the ink is important. You will be able to control how much of a tint you are applying if you thin your inks first. Additionally, you will be able to get rid of some of the glossiness inks naturally have in their finish by thinning with water.

I started by glazing Red Ink first. I did several layers and then started adding Magenta Ink and Purple Ink to the layering to keep it from getting too orange. You are going to have to do many layers of inks. This is where a hair dryer comes in really handy for painting. You will need to make sure each layer of ink is completely dry before adding more layers of ink. Use the purples, blues, turquoises and Armor Wash to glaze the shadows on the red as well. You don't want to lose the contrast you just created in the previous steps. You want to enhance it with the ink.

Keep adding layers until you have this:

And this is what the red looks like with another color against it, just so you can see the areas I painted framed well in the figure.

I chose the P3 Blighted Gold as my metal color because it is a green gold. Red and Green are complementary colors. Using a green gold against a bright red lacquered armor assisted in achieving a better balance of contrast than using an orange or yellow gold.

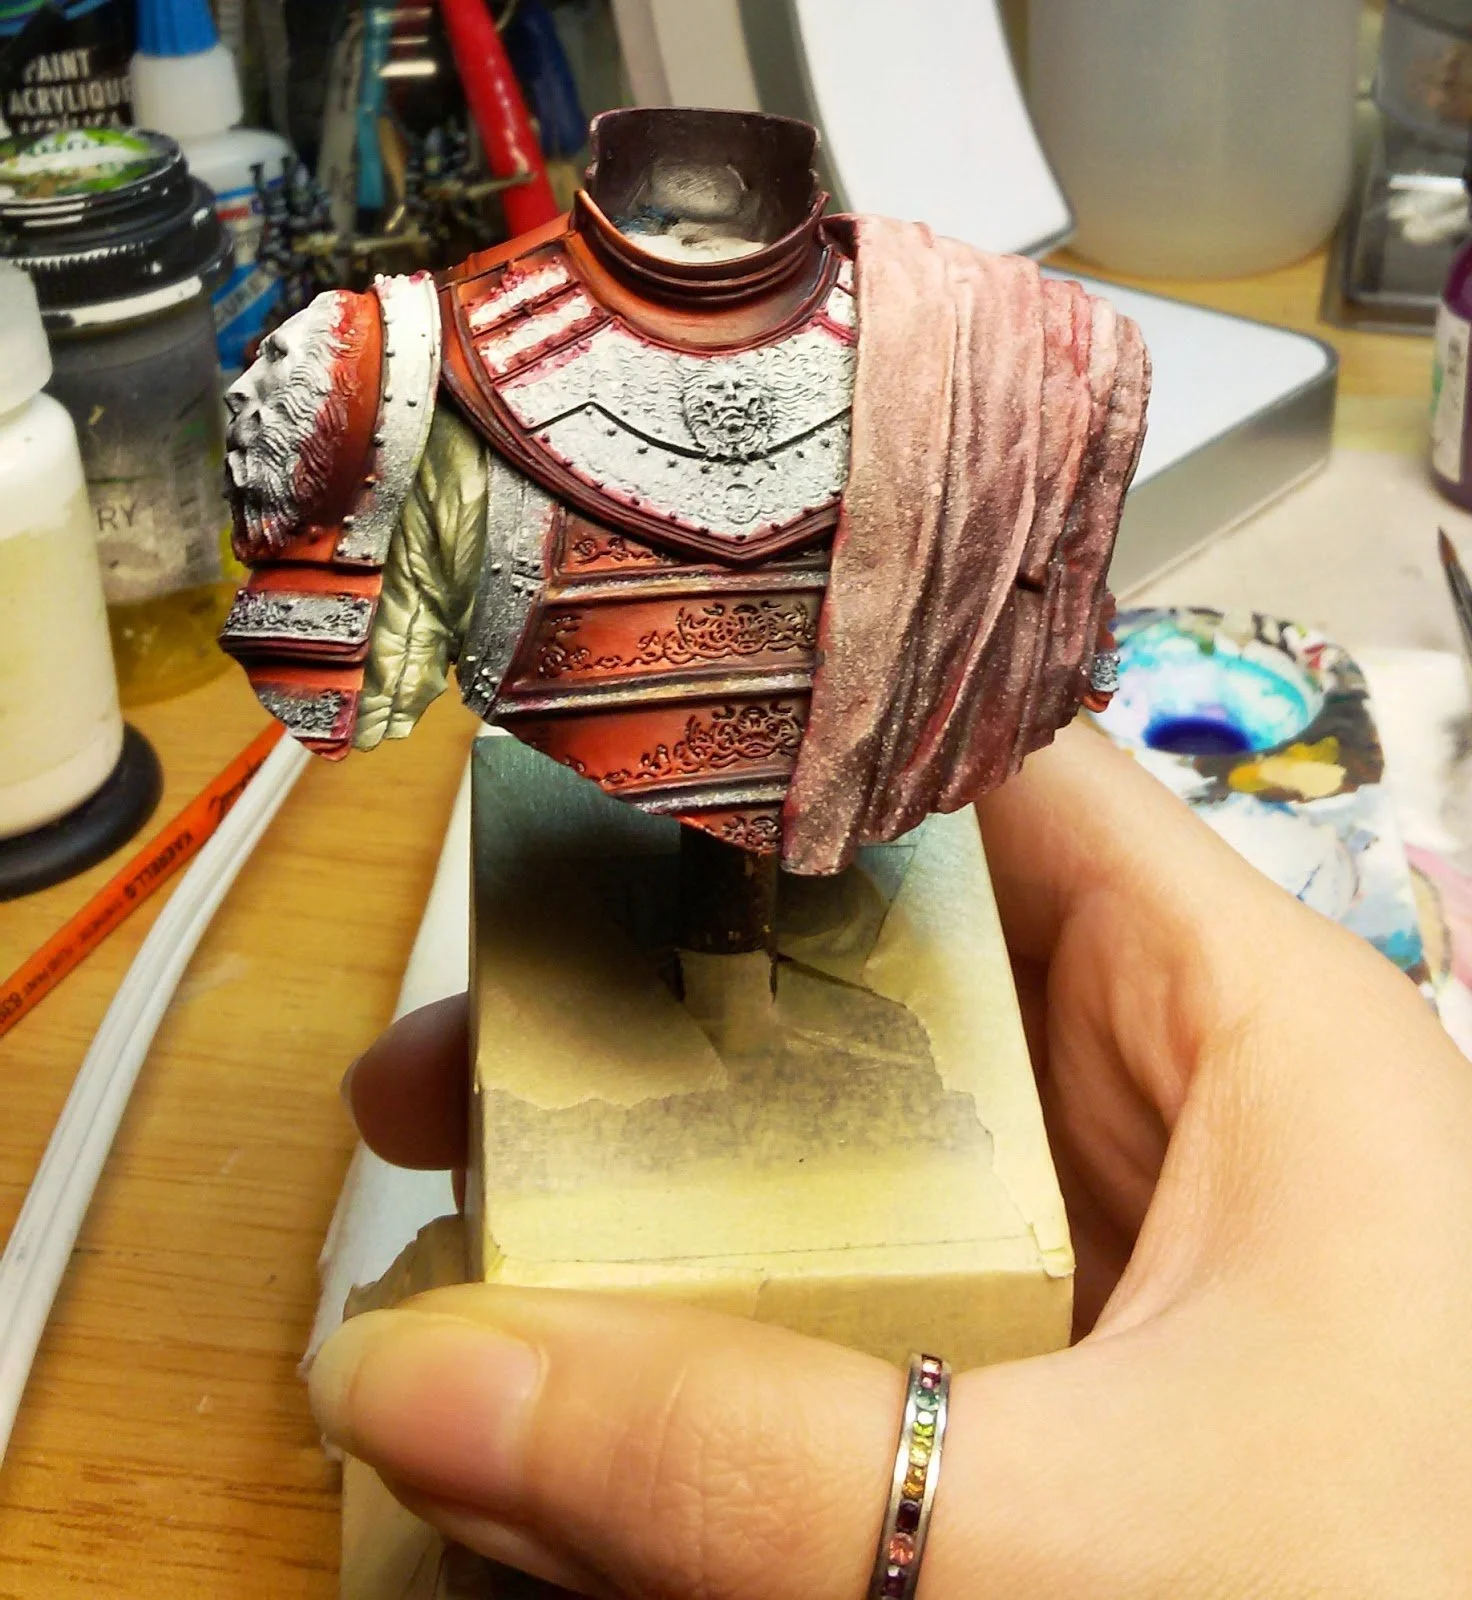
And here are some Work Bench photos of him all done and put together. I used the same method, just different colors, for the red cloth.

Thank you for taking the time to read this. I hope it was helpful for you and please feel free to share it with anyone you think may be interested. My tools have changed through the years but my method for color application remains the same. If you have any questions feel free to reach out on any of my social media linked here.

Color Theory: Contrast and Value

In the last few months I have taken to mentoring a few painters looking to improve as well as talk more with painters around the world via online meetings. It has been a luxury to be in contact with so many people and one of the positives to come out of the worldwide lock-down.

In all the many discussions and critiques I have been asked for there has been a repeating theme. Most artists are struggling to achieve an appropriate level of contrast in their work. Quite a few of them understand that this is an area they need to work on but have no idea how to train their brains to self-critique in this matter.

By the end of this blog entry, I hope to have explained what contrast is, how you can identify your levels of contrast in your own work, and how you can achieve appropriate levels of contrast in your compositions.

Before continuing with this blog, please read through Color Theory: Ultra Basics! for an introduction to Color Theory.

What is Contrast?

According to Merriam-Webster Dictionary Contrast is defined as:

  • 1a: juxtaposition of dissimilar elements (such as color, tone, or emotion) in a work of art

  • b: degree of difference between the lightest and darkest parts of a picture

Contrast in art can be explained as having a diverse representation of light and dark values to increase interest, clarity and depth. In order for a piece of art to stand out and catch our eye, we need to have varying degrees of contrast. Most of the time when we discuss contrast in miniature painting, and even in traditional and digital illustration, people are referring to light vs. dark contrast. However, this is not the only level of contrast that exists in art or in our life.

Knowing what contrast is doesn’t make it easier to understand. Crossing the hurdle from knowing the definition of this term and implementing the term is the most challenging for any artist. Before we dive into more about contrast in art, I want to take a moment to talk about contrast in life. By doing this, it will get you to think about how contrast affects your daily life and why it is so important.

Contrast in Daily Life

Without even realizing it, we experience contrast in our every day life. Contrast surrounds us and we have a passive understanding of it. For instance, when people have a cup of tea or coffee, they usually have it alongside cookies or cakes. Why is that? It’s because the juxtaposition of a strong, somewhat bitter drink with a sweet, crumbly dessert helps enhance the flavors. This is contrast of flavor.

Likewise, many people crave sweet and savory mixed together. Sugars and Salts enhance flavors when paired together. From an evolutionary standpoint, our brains seek out sweet smelling and tasting foods because they have juice (water), sugar (calories) and vitamins that keep us healthy. Savory items we crave because they have protein (help build muscle and keep blood sugars stable) and minerals (such as iron) that keep us healthy and balanced. When we get both sweet and savory in one bite, the pleasure centers of our brains light up.

If you keep up with the trends by searching through Pinterest for Fashion and Design there are quite a few examples of contrast being used. For the last couple of years the popular palette (here in Australia) has been gold, rose gold, pink, navy blue and silver in quite a bit of fashion and housewares. At first glance, many people might consider these colors an odd pairing, however, they hit all the right buttons with regards to various layers of contrast.

The navy blue provides the dark, cool, color to anchor the design palette. The light grey provides a contrasting lighter, slightly warmer tone in the color scheme. The pink is slightly darker in value and warmer in temperature to the light grey. The metallic finishes provide a shiny, reflective surface that contrasts with matte finishes when juxtaposed. Adding some pattern adds texture to the composition. All of these elements compliment one another and help enhance the design. The colors are bold, yet calming and peaceful. They provide a warmth with the pinks and rose golds. It adds a clean feeling from the simple lines, simple patterns. We find all of this very pleasing. This is all contrast at work! Contrast isn’t just light vs dark but shiny vs matte, texture vs smooth, cool vs warm, etc.

Take a look around the room you are in. Take about 5 minutes and quietly observe. Can you identify different levels of contrast?

Value

I mentioned value in a previous paragraph and this is the part many artists struggle with in regards to contrast because it requires us to observe and think more critically about our work. We have to rely on our own observational skills to judge whether or not we have an appropriate level of value contrast in our work rather than relying solely on color contrast.

According to Merriam-Webster Dictionary Value is defined as:

  • 7a: relative lightness or darkness of a color LUMINOSITY

  • b: the relation of one part in a picture to another with respect to lightness and darkness

The 7a definition is the important one here and there is a key word: “relative”. There are colors that are objectively dark and objectively light. Black and White are examples. However, you cannot discuss the value of a color in a vacuum. You have to compare colors when they are in close proximity to each other in order to judge whether or not they provide enough contrast. Values of colors are relative to one another.

In addition, if I tell someone they need to work on their contrast that does not mean I want to you to add pure white to the highlights and pure black to the highlights. I always have color mixed into both. What I am saying is that your lightest value isn’t appearing on the white end of the value spectrum when compared to your darkest color. From observation, when people get the feedback that they need to improve their contrast they seem to misunderstand that to mean they need to brighten highlights. This is not true because values of colors are relative to one another. So, if you need to up your contrast you need to look at improving your shadows and your highlights. Not just one or the other.

In order to understand what values are present in your color schemes you first have to become comfortable with a value scale.

valuescale2.jpg

This is a value scale. It is used as a guide to illustrate that your lightest value should be around values 1 - 3. Your mid-range values should be around values 4 - 6. Your darkest values should be around 7 - 9. You need to have a pretty good spread of values from one end of the spectrum to the other. When I say someone has middling values only on their artwork, that means all of their colors are sitting between values 5 - 7. This provides a rather flat composition where nothing really stands out. It is dull. It doesn’t “Pop”.

In my 2-Day seminars I run people through the exercise of creating a black and white value scale. This is something I had to do in art school and it really helped me to start to wrap my head around value and contrast. When people run through this exercise, they quickly find out that they struggle with contrast. It is uncomfortable for many of us to use such bright and such dark colors in a composition. It doesn’t feel natural or we are afraid that we are going to irrevocably ruin our art.

Take a look at the digital illustrations below. The top one is from an article, “9 Common Mistakes in Digital Art”. The image on the left is a completely desaturated version of the color image on the right. You can see that nothing stands out. It is very muddy. It is hard to get a clear picture of what is going on.

By comparison, if you look at the bottom two images by Jonathan Guzi, you can clearly read what is happening in the image when the color is removed. While still remaining dark in overall composition and values chosen, there is a good balance with lighter values to help direct the eye and give you a sense of drama and weight.

Understanding what value is is really important to create knock-out art. This is something you must grapple with if you want to produce pieces that stun audiences. This is not something you can skim over and hope you’ll get by in the art world. This along with understanding color relationships is vital for producing quality artwork.

Checking Your Contrast

When you are working on your art, you need to train your brain to recognize whether you have enough contrast and you need to force yourself to be comfortable with contrast in your work. When people ask me for feedback on their contrast I reply, rather frustratingly, “If you have to ask the question, you already know the answer.” Most people can tell their contrast is off. Knowing what needs fixing is the hurdle in the learning process. However, you have a tool at your fingertips if you have a smartphone or computer.

Take a good quality photo of your piece. Open up an art program such as Krita, Photoshop, Clip Paint Studio, Corel Painter, etc. Open your image. Go to Image>Adjustments>Saturation and completely desaturate your image. This setting is removing the hue entirely leaving only the values of the colors used. You will be able to get an idea of what you need to punch to get better contrast. By doing this repeatedly, you will start to train your brain to see value even when color is present. It is a lengthy process and you have to be consistent in checking your contrast. The more you practice looking at colors as values, the better your understanding of contrast will become.

What Not to Do . . .
When people try the desaturation trick on their photos, they get confused and think a grey-scale filter on the image is all they need to do. Adding a filter changes the integrity of the image. This is not going to give you an accurate representation of your values in your work. You must find the Saturation Setting in your editing software and remove all of the color. I have this setting in my editing software on my Samsung Galaxy phone. If you would like editing software on your computer, Krita is completely free and good for basic photo editing.

How to Improve

The tricky part for you, the reader, is to implement all of this into your painting. And to investigate the world of contrast further. Contrast isn’t just about the juxtaposition of light and dark. As mentioned previously, contrast is achieved in multiple ways. Getting comfortable with light and dark values is the first step to understanding contrast. From there, you should investigate using visual and physical textures, shiny and matte finishes, and color & temperature contrast.

Anytime you are painting, take photos throughout your process and desaturate them. This helps you to evaluate and adjust your work. You have to put into practice what you’ve just learned. Repetition is key to learning.

Practice making value scales. Try to paint a black and white value scale first, then try making color value scales. It is a tricky exercise to run through but very worthwhile. It hammers home how difficult this concept is for most people to become comfortable with and it will show you if you favor one end of the spectrum over another.

Conclusion

If you want to really improve your artwork, you must understand color theory. This is a lengthy process to learn and implement properly but it is very rewarding when you make improvements. It is a topic I am still learning and grappling with after 17 years of painting.

If you understand color theory, contrast and value, you will see an improvement in your painting. You cannot advance on technical application alone. You must understand the ins and outs of Color Theory.


Sources

  • Debra Ronca "Why do sweet and salty taste so good together?" 4 September 2014.
    HowStuffWorks.com. <https://recipes.howstuffworks.com/sweet-and-salty-taste-good.htm> 1 July 2020

  •  Kliever, J. (2020). Designing with contrast: 20 tips from a designer. Retrieved 1 July 2020, from https://www.canva.com/learn/contrasting-colors/

  • Merriam-Webster. (n.d.). Contrast. In Merriam-Webster.com dictionary. Retrieved July 1, 2020, from https://www.merriam-webster.com/dictionary/contrast

  • Merriam-Webster. (n.d.). Value. In Merriam-Webster.com dictionary. Retrieved July 1, 2020, from https://www.merriam-webster.com/dictionary/value

  • Feghali, W. (2020). 9 COMMON DIGITAL ART BEGINNER MISTAKES AND HOW TO AVOID THEM. Retrieved 1 July 2020, from https://www.evenant.com/design/9-common-digital-art-beginner-mistakes/


Psychology of Miniature Painting

By Trent Denison

Psychology of Miniature Painting

When people ask me questions like “Have you got any tricks to be better?” or “How did you get so fast at painting?” my default response is: you need practice.  It’s a true statement, but I thought I would expand and break down some of the how.  


Zone of Learning

This is a pretty basic model of the way a human being learns things:  If you take a basic task like making yourself a coffee with your own machine at your house, generally speaking, most people don’t have to think about this at all.  It is a task that can be completed without any challenge. This is an example of the comfort zone.

Now imagine being put in front of a thousand dollar machine that a trained barista might use?  Most people simply wouldn’t be able to use it correctly, or if they tried the coffee probably wouldn’t come out nice, or even at all.  This is the panic zone. The most important thing about this zone is that the default human response is to go into fight or flight mode.  You won’t learn anything, you will just look for a way to get yourself out of this situation.

However, what if you simply decided to upgrade your machine so it has a couple of new features, like maybe a little attachment that heats up your milk, but is basically similar to your old machine?  Welcome to the zone of learning. You will feel a little uncomfortable here, particularly if it is the first time you’ve tried using your machine, but after a couple of tries, maybe a bit of spilt milk, you will be making a better coffee in no time.

paniczone.png


Miniature painting is no different.  It’s a learned skill, but if you are at the stage where you’ve just learnt how to dilute your paint correctly, or started to shade and highlight, I guarantee you that painting a model with NMM and OSL from two different light sources is going to slide you right into the panic zone.

The most important point about this is that reaching too far above what you are comfortable doing is probably not going to help you improve much as a miniature painter. It’s definitely still better than no practice at all, because at least you are developing a tactile feeling of diluting paint on a palette, paint coming off the brush or just what colours look like.  It’s all going to give you experience, but in terms of application and technique, it’s reaching too far.

The panic zone in miniature painting is going to make you look at your work and feel like shit that you can’t achieve something.  BUT, if you stay in your comfort zone, and keep doing things that you know you can do…. You won’t improve.

The lesson: Challenge yourself with one thing new on each project.  Maybe something like painting a colour you don’t like to use, or couple of paints from a new range, or a different technique like wet blending or loaded brush.    Don’t reach too far!


Skill Ceiling vs Knowledge Ceiling

Another common misconception comes from “taking classes” or “signing up for a Patreon”.  This is absolutely going to help you improve as a painter… if you have the right skillset and capability to implement the teaching.

Unfortunately when most people take a class or watch painting videos, they expect immediate improvement.  Or, they go back to their painting desk with enthusiasm to do something completely different, and reach the panic zone in a matter of minutes (see above).

When you take in knowledge, it does not translate into ability.  Because despite the type of learning (audio, visual or written), this does not give you the ability to retain and implement that learning.  You need to take that information from your brain and program it into your hands. And you achieve that by simply… doing.  

learningpyramid.png

This chart shows exactly how much information people retain from the different types of learning.  And even more importantly, if you are learning information that sits way outside of your comfort zone, it’s likely that you will retain even less than that.

Sometimes, you will have the opposite problem.  You will feel like you are executing things exactly as you see them in your brain, and that is the moment you should go to a class, or sign up to a new Patreon and see a new approach. This ties into the zone of learning.  

The lesson: Understand when it is important to learn more, and when it is important to practice more. 

Mistakes

Bob Ross: “We don’t make mistakes, we just have happy accidents.’’

bob-ross-promojpg1.jpg


Mistakes are one of the most important moments in any type of learning.  It’s like a little challenge every time you make one, which helps you to improve.  However, what is hardest to do when making a mistake is embracing it. Most people dread it: about to start the last stages of painting their model, trying some great freehand on a tattoo… and you get paint way out of the lines, and ruin all the nice work you did underneath.

Here is the thing you have to remember: There is almost literally NOTHING you can do to a miniature that you cannot fix.  The absolute worst case scenario, breaking a model into many pieces or paint chips everywhere… you could strip it, or even buy a new one.  I concede if its a piece you can no longer purchase, or an original sculpt, or you drop it into acid… sure. It’s fucked.  

But most mistakes are far less serious than that.  Mostly they are just… putting paint in the wrong spot.  That is something you can correct. If you are quick enough, you can take a moist brush (not wet, moist), and soften out the mistake.  In fact… this correction often has a sneaky benefit. If you accidentally get red paint from a cloak onto the skintone you spent forever on, and you soften it out quickly enough, then you probably still have red tinges on the skin.  Believe it or not, this is actually true to life, thanks to the way that light works. It bounces off things and adds shades and colours all around. Things never exist in a vacuum. That little bit of red on the skin will create a sense of harmony between the two areas, it will add natural variation and nuance.  You might need to paint over a couple of little bits that dried too quickly, but the end result will be an improved product.

So why worry about making mistakes?  Once again, I draw back to the zone of learning.  Making mistakes is going to give you little lessons along the way.  Embrace the mistakes and treat them as a positive in your painting.

Ultimately, the goal in this hobby is to HAVE FUN.  Everything that I talk about in this article should bring you back to this one fact.  I paint because I love to paint. I love creating little stories, and having something that helps me relax, and feel positive.  Because I have fun when I do it, I keep doing it more. When you do something more, you get better at it. So enjoying painting is crucial to improving, and fixating on mistakes will take away some of the joy.  Mistakes are opportunities to learn and get better.

The lesson: Worrying about mistakes makes you enjoy what you are doing less. Paint more, learn from mistakes and have fun so you keep wanting to paint more. 


Taking Feedback

One thing I do a lot of is post pictures for feedback.  Contrary to popular opinion, this is not for the purposes of social media epeen competitions, although I do like to drop a few bombs on occasion.

The purpose is to actively seek constructive feedback on all aspects of a piece I am working on.  Very rarely is it possible to disassociate the model you are painting, the amount of hours and effort invested, and the actual quality and technical aspects of it.  We are blind to our own habits and mistakes sometimes, and it’s only when others call us out on them that we become aware. Positive feedback might help keep you enthusiastic about a project, which is great, but it’s really negative feedback that I want to get, and here is why.


First, I want to explain the four stages of competence.

psychologyflowchart.png

Let’s say you are learning to juggle.  Usually we start any task like juggling at Unconscious Incompetence.  Or, as I like to describe it: You are shit, but you don’t even realise you are shit. In this case, you’ve never seen juggling before, but you watched a guy do it and want to try it.  Welcome to Unconscious Incompetence.

Conscious Incompetence is the next stage.  Someone or something has caused you to be aware of the mistake, issue or error you are making, and suddenly you know what you are doing wrong.  This is a crucial stage, because without this information, we don’t even know we need to improve. In our juggling example, you’ve picked up three balls and thrown them up in the air, and realised that you actually have no idea how to do it.

Conscious Competence follows, and this is you working on improving at the task or process.  The important part of this stage is that you have to remind yourself of the processes continually, and consciously think about how to perform the task correctly.  For the juggling example, it’s a matter of counting out numbers and timing the tempo of your throws to these numbers (so I learned to juggle, so what? Fight me) 


Final stage, and what many people consider the ultimate goal, Unconscious Competence.  You pick up three juggling balls and start nailing it and talk to your mates while you do it.  You don’t even need to think any more, it just happens.


A quick final note on Unconscious Competence. I feel like technical tasks like paint dilution and paintbrush use it’s important to reach this stage, but for something like colour selection or theory, you should always try to force yourself back into Conscious Competence, and actively thinking about WHY you do things.  It will help you understand a lot more of your thought processes and continue to improve.


Bringing it back to painting, getting negative or constructive feedback is important.  Without hearing things that have room for improvement (and as I said, we often are blind to things due to our own perspective), you can sit in Unconscious Incompetence and never even know you need to fix them.  By getting feedback, you can establish awareness of an issue, and consciously make an effort to fix it. Now whether you agree with the feedback or not, and decide to fix it or not, those are choices you can make armed with the information that you have been given.  I rarely take on board everything that I hear back about my pieces, but it’s rare for me to change nothing about a piece either.

Of course, it’s not always easy to embrace negative feedback.  The default, immediate response when someone criticises hours of effort is defensive, to fire back a salvo about why that person is wrong. It’s normal and completely expected to have a twinge of disappointment when you hear someone thinks your work sucks or has something bad to say about it, especially if it’s work you’ve put hours of effort into and sacrificed time from other parts of your life for.  

The hardest thing to do is step back and look at what the person is saying logically and non emotively.  When you do this, you can start to really analyse your work more effectively. After you’ve been buried in painting something brushstroke by brushstroke, sometimes it just takes a tiny little observation that someone else makes to get the ball rolling on how the piece can be better.  

The lesson: Seeking constructive negative feedback is crucial to understand areas and opportunities for improvement that you may not have been aware of.   Embrace this feedback as a great opportunity, and not as an attack.   


Sacrifice and Understanding Goals

I used to work with a guy who was a bodybuilder.  He was a massive guy, all rippling muscle. One day I asked him how on earth his body looked that good.  Every day he got up and spent three hours at the gym in the morning before he went to work. He strictly controlled his diet, rarely if ever having meals that were bad for his ultimate goal of being completely shredded.  He also spent some of the afternoon in the gym as well.

I wanted to be a specimen like him, so I gave it a crack, and unsurprisingly I failed.  I liked my sleep way too much. Any person in the world has the ability to have a body that looked like that guy, so why doesn’t everyone?  The answer is sacrifice. 

Not everyone is willing to sacrifice doing the things they enjoy, or possesses the ability to dedicate themselves purely to a task and follow through.  It’s a learned skill like any other, but sometimes people just want to mung on a Big Mac, or take a night off the gym to go hang out with mates.

Welcome to the unfortunate reality of setting a goal.  Everyone seems to be time poor these days, and a lot of people tell me they don’t have time to paint.  Most of the time what they are really saying is “I don’t prioritise painting enough to make time for it”.  If you wanted to get right into the heart of the matter, if something is important enough to you, you will make the time, usually by giving up something else.

For the guy I used to work with, it was giving up a few hours of sleep every day, and eating the things he used to eat.  For me, it is giving up some time watching TV (and also, the gym LOL) to spend a few hours painting every night. I do it before I go to bed, to the point now where it becomes a routine the I look forward to.  It is a quiet, relaxing time that I enjoy.

Not everyone has the luxury of being able to choose to paint every day, with the pressures of work, of families, of friendships.  But being able to improve at something will almost always requires sacrifice of something else. The important thing is recognising that fact.

So we arrive at the point of this section. You need to understand what you want to achieve out of your painting.  If your goal is to win a medal a painting competition, then you know that dedication and diligence is the only way to improve, and you will need to sacrifice something to find that time to work on it.  If your goal is to have fun while painting, the sacrifice needed is probably significantly less. If your goal is to improve so you can paint your army for a game, or paint your first bust, or paint a model, all of these have different levels of sacrifice that you’ll need to make to achieve them.


The lesson: Understand what your goal is, and appreciate that to achieve anything worth having, there will be some sacrifice.  Work out whether you are willing to make that sacrifice, and if you aren’t, maybe you should adjust your goal.


There are some of my thoughts on how to be a better miniature painter without ever really talking about miniature painting.  This is why my default response is: you need practice. Because it’s hard to distill all of my above thoughts and learnings into anything other than that.   I’ll leave you with what I consider my mantra in both painting, and life:

You can achieve anything you set your mind to with the Three Ps: Passion, Perseverance, and Practice, Practice, Practice.


BIG DENO OUT

10 Year Challenge

The 10 Year Challenge is comparing your work from then, 10 years ago, and now. I haven’t done one of these before and I finally have an example! Plus, I’ve been seeing a lot of artists I follow posting up their 10 Year Challenges lately so I thought I’d join in on the fun.

Then . . .

10 Years ago (or thereabouts) I painted my first copy of Azrin the Barbarian from Reaper Miniatures. Then, I did a weapon swap so that she was wielding am axe and hammer. Then, this was one of my first display bases where I tried to do more than just some grass and rocks. I made the steps out of stained glass remnants, the tree out of a twig I found on a walk with a little vine wrapped around it and I even tried using jewelry wire to create a short railing. My idea at the time was she was a jungle dwelling dwarf protecting a temple. She had a wolf companion to help her. Everyone needs a good doggo!

OldAzrin.jpg

Now . . .

Now, I decided to revisit this piece. I had a spare Azrin the Barbarian in my collection and I wanted to paint something smaller amidst larger projects. I needed that sense of accomplishment of finishing a project. I used my Then Azrin as a reference and redesigned the composition using the knowledge I now possess to make a better piece. A lot of the same elements are there but more refined and added to. I also have better materials to work with than I did 10 years ago. Partly because Mark has a hoard of basing supplies.

Azrin1resize.jpg

Critique

There are some major differences between the two pieces. First, the faces show a pretty big change in not only color use on skintones but lighting and expression. I also bent some areas of the new Azrin to give the pose a bit of dynamic movement the original was lacking.

I used general overall lighting on the Old Azrin which is why it looks very low in contrast levels. On New Azrin I used Atmosphere throughout the entire piece which helps it all feel like it is a coherent scene. Every part has the same colors used for shadows and highlights. The only thing that changes are the local colors.

You can see almost all of the elements between the two pieces are the same. Except for the wolf. I couldn’t find a good spot for a familiar on the new base so I left it off. Otherwise, there is still a tree, but with more interesting color and texture. There is still moss on the stairs but I used flock instead of glued down cornmeal. I still have flowers but I used MiniNatur basing materials instead of dried flowers. And the steps are still stone but I built them using cork board and milliput. Lastly, there is still a fence/railing but I used pre-made fences from a dollhouse supplier that is a good scale. Instead of trying to make my own with wire.

Overall, the newer piece has a more refined look to it. It has more polish.

I want to leave off with a message for those who maybe struggle to see improvement from piece to piece: persist! Even if it feels like you aren’t making progress because it can be slow in coming, you are still evolving more than you know. You will soak up information the more you are exposed to ideas and techniques. The more you look at art across many different formats the more you will identify, subconsciously, what makes something appeal to your sensibilities. And don’t be afraid to do your own 10 Year Challenge!

#miniaturepainting #10yearchallenge


Light and Shadow

I was just looking for examples on how to explain light and shadow for my beginner's class this weekend when I happened upon this blog. It is an excellent resource! It covers a lot of the different areas of understanding light and shadow that I had to go over in my drawing classes in art school. 

If you are someone who struggles with highlight and shadow placement, read through this and follow along with the couple of quick exercises. It is well worth the read. 


Understanding Light and Shadow by Monika Zagrobelna